The allure of a doorless shower is undeniable. It brings a sense of spaciousness, modernity, and accessibility to any bathroom, transforming it into a sleek, open-plan sanctuary. However, the most common apprehension—and often the most common problem—is a simple one: how do you stop the water from escaping all over the floor? The good news is that a successful, watertight doorless shower is not a myth; it's a triumph of intelligent design over brute force barriers. By understanding and applying key principles of gravity, drainage, and deflection, you can enjoy the aesthetic freedom of a doorless walk in shower without the daily mopping session. This comprehensive guide delves into the top strategies, from fundamental construction to clever accessories, to solve the water containment puzzle for your UK home.
The Foundational Principles of Doorless Shower Design
The enduring success of a doorless shower is not achieved through afterthoughts or quick fixes; it is engineered into existence from the ground up. Before a single tile is laid or a glass panel is fitted, three core, interdependent principles must govern the design: slope, drainage, and threshold strategy. These are the non-negotiable pillars that manage the physics of water flow. Ignoring them in favour of aesthetic considerations alone is the most common reason for failure, leading to persistent puddling, damp problems, and the very water escape the design seeks to avoid. Understanding these principles is essential for both homeowners planning a project and installers executing it.
The Critical Role of the Shower Slope (Gradient)
Gravity is your most powerful and silent ally. The entire shower area—whether a pre-formed shower tray or a fully tanked wet room floor—must be sloped towards the drain. This gradient, often referred to as the "fall," is non-negotiable. In a typical UK installation, a minimum slope of 1:60 to 1:80 is recommended. This means for every 60-80mm of horizontal distance, the floor should fall by 1mm. This gentle but consistent incline ensures water flows efficiently to the drain without pooling, reducing the opportunity for it to run off towards the entrance. An incorrect slope is the primary cause of water escape in a poorly installed doorless shower.
Centred vs. Linear Drains: Impact on Water Containment
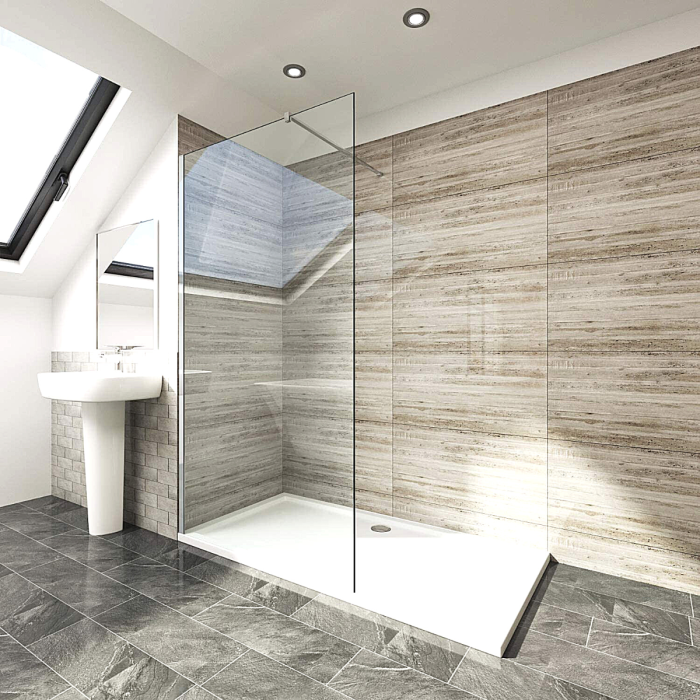
Your choice of drain dictates the entire floor shaping strategy. A traditional central (point) drain requires the floor to slope from all directions towards a single point in the middle. This can create a more pronounced "bowl" effect and makes achieving a truly level, curbless entrance trickier. In contrast, a linear drain is a game-changer for doorless and walk in shower designs. This long, narrow channel drain allows for a single, consistent plane to slope in one direction only. You can create a level threshold at the entrance while the floor slopes seamlessly back towards the linear drain, often positioned against the far wall. This is the gold standard for modern, leak-free doorless showers.
The Importance of Curb Height and Threshold Design
The term "doorless" doesn't always mean "curbless." While a fully flush, wet room style is popular, incorporating a low threshold or a subtle curb can be a highly effective containment strategy. A threshold as low as 20-30mm can act as a crucial psychological and physical barrier to water creep, while still maintaining an accessible, open feel. For a completely curbless design, the precision of the floor slope and the positioning of the drain become even more critical.
Primary Design Solutions to Stop Water Escape
While the foundational slope and drainage are non-negotiable, the visible design choices you make are what ultimately corral the water into its designated zone. These solutions work by creating strategic barriers and guiding principles that manage airflow and water momentum, turning an open space into a functionally contained one.
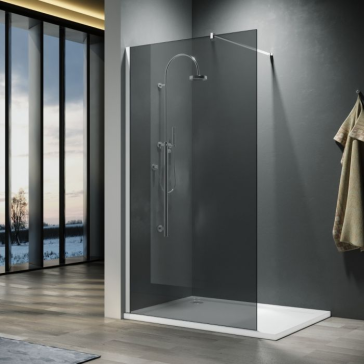
Installing a Shower Screen or Partial Glass Panel
The strategic installation of a glass panel is the most effective and elegant way to reconcile the doorless aesthetic with practical water containment. It acts not as a full enclosure, but as a targeted shield. The key is in the positioning: a single fixed glass panel along the entry side of the shower interrupts the path of water droplets propelled by the showerhead. For a corner shower, an L-shaped glass screen attached to two walls creates a contained nook while leaving the front open.
The specifications matter greatly. A panel should ideally extend from the showerhead wall to at least 300mm beyond the point of entry, creating a psychological and physical buffer. The height is equally critical; a minimum of 900mm is standard, but a full-height screen (from floor to ceiling) is the ultimate barrier, also helping to contain steam and warmth. For a minimalist look, frameless glass panels with discreet clamp fittings maintain the open sightlines. An often-overlooked advantage is that this glass can also serve as a mounting point for a handheld shower on a rail, keeping the fixture within the contained area.
Using a Shower Curtain with a Doorless Shower
A shower curtain offers a remarkably flexible and cost-effective containment strategy, perfect for retrofits or rental properties. The secret to success lies entirely in the hardware. A standard straight rail invites the curtain to blow and gap. Instead, opt for a ceiling-mounted curved shower rail that follows the perimeter of the shower area. This allows the curtain to form a complete enclosure when drawn.
The curtain itself should be heavyweight, preferably fabric-backed PVC or PEVA, with reinforced stitching. Integrated magnetic weights along the bottom hem or a built-in weighted bar are essential to keep the curtain垂ing straight and resisting the inward suction of airflow (the Bernoulli effect) that plagues many shower setups. For a truly tailored look, a double-curtain system on a wrap-around track can create a luxurious, full enclosure that still offers the flexibility of a doorless entry when pushed back.
Designing an Effective Shower Lobby or Entry Angle
This architectural approach uses the bathroom's very structure to solve the water problem. By designing the shower entrance to require a turn, you utilise walls as natural splash guards. The most common form is the angled-entry or L-shaped shower, where the entrance is located to one side, not in the direct line of fire from the showerhead. This forces a 90-degree turn, meaning water spray must travel around a corner to escape—a feat it cannot accomplish.
Taking this further, a dedicated shower lobby involves recessing the shower area and creating a small, often tiled, vestibule. This might mean the entrance involves two slight turns. Not only does this contain water impeccably, but it also provides a clear transition zone from the wet area to the dry bathroom, a place to place a bath mat and step onto safely. This design is a cornerstone of wet room philosophy, where the entire space is waterproofed, but the shower area is psychologically defined by layout and level changes.
Selecting the Right Size and Shape for Your Doorless Shower
Containment is intrinsically linked to proportions. An excessively large doorless shower can be counterproductive, as water droplets have more space to gain momentum and splash beyond the zone. A compact, well-defined footprint is easier to manage. A square format (e.g., 900x900mm or 1000x1000mm) is often more efficient than a long, narrow rectangle.
The placement of the showerhead relative to the opening is paramount. Ideally, it should be mounted on the wall farthest from the entrance or on a side wall perpendicular to it. This directs the primary flow into the heart of the enclosure. Additionally, consider the shower niche or shelf placement; positioning it on the wall opposite the showerhead encourages the user to turn away from the entrance while reaching for products, minimising splash-out. The shape of the ceiling can also play a role; a slightly sloped or vaulted ceiling above the shower can help direct condensing moisture and airflow. Ultimately, a cohesive design where size, shape, and fixture placement work in concert creates a natural containment field that makes additional barriers more effective.
Flooring & Drainage: The First Line of Defence
The floor of your doorless shower is not a passive surface; it is an active, engineered system designed for one primary function: to evacuate water with silent, swift efficiency. While barriers like glass panels manage spray, the flooring and drainage foundation manages flow and volume. Getting this base layer wrong renders all other containment strategies futile, as water will inevitably find the path of least resistance—usually across your bathroom tiles. This is where the principles of wet room design come to the fore, demanding precision in gradient, technological innovation in drainage, and strategic selection of materials.
Achieving the Perfect Shower Tray or Wet Room Floor Slope
For a pre-formed shower tray, choose one specifically designed for doorless installations, often with a built-in slope towards a linear drain outlet. For a fully tiled wet room, the slope (or "fall") is created using a cement screed or a proprietary levelling system over the waterproofing layer. This must be calculated and executed with precision by a professional. A failure here will lead to pooling water and inevitable escape.
Choosing the Best Drain for Your Doorless Shower: Linear is King
As outlined, the linear drain is the superior choice for most doorless showers. It enables the optimal single-direction slope and a flush threshold. When selecting one, consider grating style (for grip) and placement. Positioning it across the back wall or on the side opposite the entrance is most common. It’s a worthwhile investment that sits at the heart of a functional doorless shower.
Non-Slip Flooring Materials for Safety and Containment
The floor finish plays a dual role. Non-slip tiles with a textured, matt, or riven finish not only prevent accidents but also help to slow the flow of water, reducing bounce and splash. Larger format tiles with minimal grout lines mean fewer channels for water to travel along. For a truly seamless look, consider a resin wet room floor, which provides a slight texture and can be formed with a continuous, gentle slope.
Strategic Accessories and Water Management Tricks
Beyond the fundamental architecture of slope and the primary barrier of a screen, achieving a truly dry bathroom floor often comes down to a layer of intelligent refinements. These strategic accessories and user-aware practices address the final 10% of water escape—the drips, the splash-back, and the capillary creep that can defy even the best designs. This is where thoughtful product selection and habitual tweaks consolidate your containment strategy, transforming a good doorless shower into a flawless one.
Positioning Your Showerhead to Minimise Splash
The type and direction of your showerhead are crucial. A powerful, drenching rainfall head mounted directly overhead tends to create less lateral splash than a directional wall-mounted head. If using the latter, ensure it is angled towards the shower wall or the centre of the space, not towards the entrance. A handheld showerhead on a slide rail offers the most control, allowing you to direct the flow away from the open area.
Utilising a Shower Mat or Bath Mat Outside the Zone
Place a highly absorbent bath mat or a specific shower mat directly outside the shower entrance. This won't stop a flood, but it will catch the drips and droplets that accompany you as you step out, keeping the rest of the bathroom floor dry. Choose a quick-dry, machine-washable material for hygiene.
The Role of a Quality Shower Rail or Riser Kit
A wobbly, insecure shower arm or riser kit can cause the showerhead to move during use, spraying water erratically. Invest in a solid, well-fitted shower rail or fixed arm. Stability is key to predictable water flow.
Innovative Solutions: Water Deflectors and Threshold Strips
For a near-invisible barrier, slimline water deflector strips or slightly raised threshold strips can be installed on the floor at the shower entrance. Often made from chrome or brass, these sit just a few millimetres high but can effectively halt the creeping flow of water along the floor. Similarly, continuing wall tiles around the entrance corner creates a small lip that helps contain water.
Common Mistakes to Avoid in Doorless Shower Design
Even with the best intentions, overlooking key details can undermine the entire functionality of a doorless shower. These errors often stem from a misunderstanding of how water behaves in an open space or from prioritizing aesthetics over hydraulic principles. Avoiding these pitfalls is essential to prevent persistent dampness, water damage, and the frustration of a bathroom floor that never stays dry.
-
Incorrect Slope or Poor Drain Placement: This is the cardinal sin. Never compromise on the precision of the floor gradient.
-
Choosing an Oversized Showerhead for the Space: A massive rainfall head in a small, doorless enclosure is an invitation for splash-out. Scale your fixtures to your space.
-
Neglecting the Entrance Wall and Adjacent Areas: Failing to properly waterproof (tank) the walls immediately outside the shower zone, or using water-vulnerable materials like plasterboard, will lead to damp and damage over time.
The Final Words
Achieving a perfectly water-contained doorless shower is an exercise in harmonising form with meticulous function. It requires a layered approach, where the unseen science of a precise slope and superior drainage forms the foundation, complemented by the visible strategy of glass panels, clever layouts, and thoughtful accessories. By respecting the principles of gravity, flow, and deflection, you can confidently embrace the open, spacious, and modern aesthetic of a walk-in shower without sacrificing a dry, practical bathroom environment.
For guaranteed results, especially for complex wet room projects, always consult with a specialist. If you are inspired to begin planning your own doorless shower or wet room project, explore the extensive range of design-led solutions and expert guidance available. For more walk-in shower ideas, detailed product specifications, and professional insights into creating your perfect, water-tight sanctuary, visit Elegant Showers. Our gallery of installations and expert advice can help you transform your vision into a beautifully functional reality.
FAQs: Your Doorless Shower Water Containment Questions Answered
Can you really have a doorless shower without water getting everywhere?
Yes, absolutely. It requires meticulous planning of the slope, drainage, and often a strategic glass panel or curtain, but it is entirely achievable. Thousands of successful wet rooms and walk in showers across the UK are testament to this.
What is the best drain for a doorless walk in shower?
A linear drain is widely considered the best for most installations. It allows for a consistent, single-plane slope towards the drain channel, minimising standing water and facilitating a truly level, accessible entry, which is ideal for both safety and containing water flow.
Do you need a special shower tray for a doorless shower?
It's highly recommended. You need either a "wet room" tray (often a low-profile, pre-sloped base designed for linear drains) or a specifically formed and tanked floor. Standard shower trays are not designed for curbless, doorless installations.
How much does it cost to install a doorless shower in the UK?
Costs vary dramatically. A simple retrofit using a shower curtain and existing drainage might cost a few hundred pounds. A fully tanked wet room with underfloor heating, a linear drain, and a custom glass screen is a significant investment, typically ranging from £3,000 to £7,000 or more, depending on size and materials.
Are doorless showers colder than enclosed ones?
They can be, as there is less containment of steam and warm air. To combat this, ensure you have a powerful extractor fan to manage humidity, and consider adding underfloor heating or a heated towel rail nearby for comfort when stepping out.


Validate your login