

Every UK installer has faced it: you order an 800mm shower screen, arrive on site, and discover the actual wall-to-wall opening is 785mm. The screen won't fit. The problem wasn't the screen — it was a fundamental misunderstanding of nominal size versus adjustment range.
This article explains the critical difference between nominal size (the labelled, rounded dimension used for product categorisation) and adjustment range (the actual fitting tolerance built into the screen). For UK installers, prioritising the adjustment range over the nominal figure is not optional — it is the difference between a professional fit and a costly return.
We cover definitions, UK standard dimensions, wall tolerance issues, measurement best practices, and a step-by-step installer protocol. By the end, you will understand why shower screen measurement is the most important skill in bathroom installation.
What Is Nominal Size in Shower Screen Measurement?
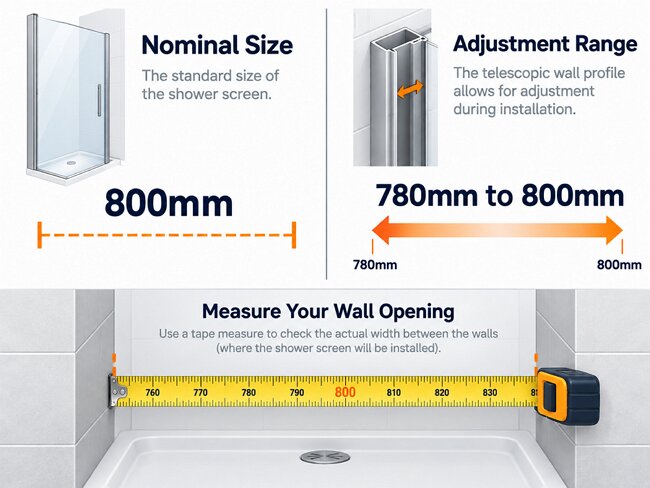
Nominal size is the rounded, labelled dimension used for product categorisation — an "800mm shower screen," a "900mm wet room panel," or a "1000mm bath screen." It is the marketing and catalogue size, not necessarily the exact physical dimension.
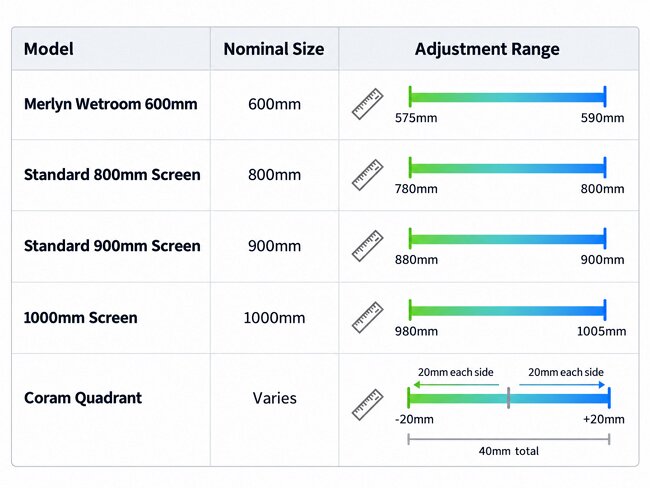
Nominal size is a shorthand. An 800mm screen may actually measure 790mm of glass, with the remaining allowance built into the wall profile. For example, Merlyn's 600mm wetroom screen has a nominal width of 600mm but an adjustment range of 575–590mm. This demonstrates that the nominal figure and the actual fitting dimension are not the same.
Manufacturers use nominal sizing for standardisation at retail, compatibility with common shower tray sizes (800mm, 900mm, 1000mm), and simplification of the buying process. The nominal size shower screen label tells you what category the screen belongs to. It does not tell you whether it will fit your specific opening.
What Is Adjustment Range in Shower Screen Measurement?
Adjustment range is the minimum-to-maximum width or height range over which the screen's wall profiles, channels, or hinges can be extended or retracted to accommodate real-world wall conditions.
Mechanically, wall profiles slide or telescope, hinges have slotted fixings, and vertical adjustment allows levelling on uneven trays or floors. A screen labelled "800mm" may have an adjustment range of 780–800mm, meaning it can fit openings between those two figures. Another example: a 1000mm screen adjusts from 980–1005mm.
It is important to distinguish between width adjustment (for out-of-true walls) and height adjustment (for tray level and ceiling clearance). The shower screen adjustment range is the actual fitting tolerance. It is the number that determines whether the screen will work on site.
Why Installers Must Prioritise Adjustment Range Over Nominal Size
UK bathrooms rarely have perfectly square, plumb, or parallel walls. Plaster thickness, tile depth, and decades of settling mean that an "800mm opening" may measure anywhere from 780mm to 820mm depending on where you measure.
Ignoring adjustment range has financial and practical consequences: screens that don't fit, costly returns, delays, forced reliance on thick silicone beads to "hide" gaps (which fail over time), and potential glass stress fractures from forcing a screen into an opening that is too narrow.
The concept of out of true wall adjustment is a UK trade term for the millimetre allowance built into wall profiles to compensate for walls that are not perfectly vertical or parallel. The rule is simple: Always measure the opening first, then select a screen whose adjustment range encompasses that measurement. Never select a screen by nominal size alone.
The adjustment range is the installer's safety margin. It absorbs the real-world imperfections that nominal sizing ignores.
UK Standard Shower Screen Sizes: Nominal Dimensions Explained
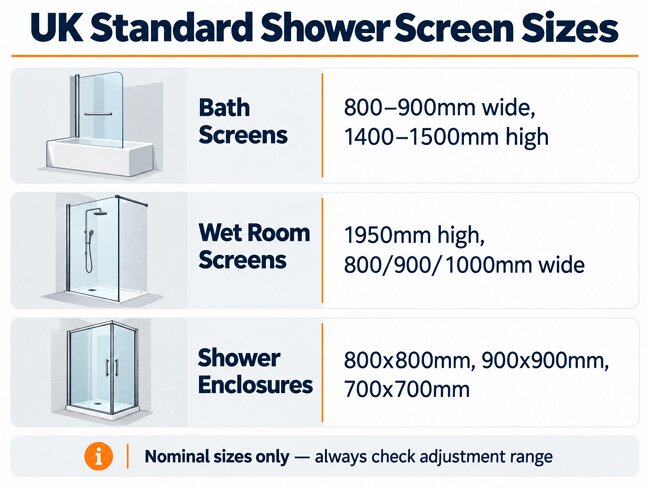
UK standard nominal sizes provide a reference point. Bath screens typically range from 800mm to 900mm wide and 1400mm to 1500mm high. Wet room screens are commonly 1950mm high, with widths of 800mm, 900mm, and 1000mm being the most popular choices. Shower enclosures come in standard square sizes of 800 × 800mm and 900 × 900mm, with compact sizes around 700 × 700mm.
These are nominal categories. The actual adjustment ranges vary by manufacturer and product line. Glass thickness also matters: 6–8mm for framed or sliding screens, 8–10mm for frameless or hinged screens. Thickness affects the weight and the fixing requirements, which in turn affect the practical adjustment capability.
UK standard sizes provide a starting point for selection. The adjustment range narrows the choice to screens that will actually fit.
UK Building Regulations and Standards: What Installers Must Know
Relevant standards include BS EN 14428 (shower enclosures — functional requirements and test methods) and EN 12150 (toughened safety glass). UKCA marking requirements apply to shower screens placed on the Great Britain market since 1st January 2021.
Approved Document M (Accessible Bathroom Requirements) is relevant where accessibility is a consideration: shower screens should allow wheelchair access without obstruction, and fold-back glass panel screens are recommended for accessible installations.
Building regulations do not mandate specific nominal sizes for shower screens in domestic settings, but they do mandate safety glass and water containment. The adjustment range is a manufacturer specification, not a regulatory one, but it is critical for compliance with the installation's functional requirements. Compliance is about safety and accessibility. The adjustment range is about fit. Both matter.
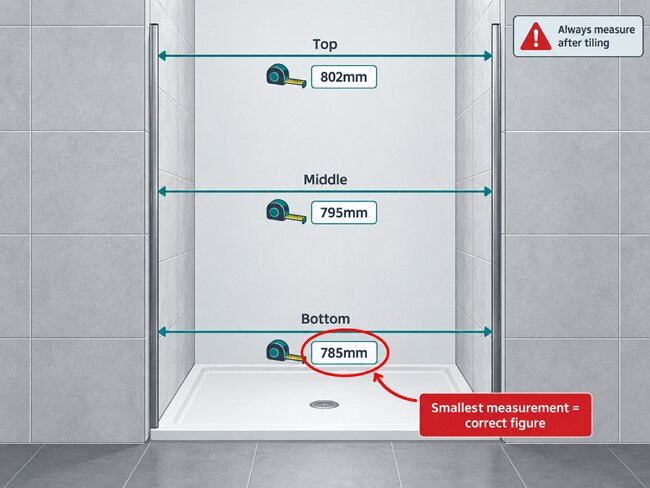
How to Measure a Shower Screen Opening Correctly (UK Installer Method)
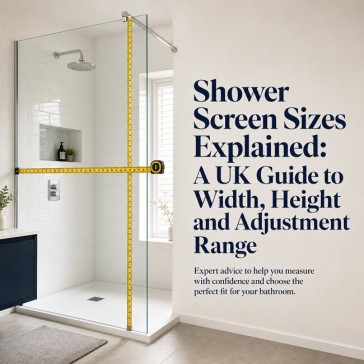
Step 1: Measure at three points. Measure the width at the top, middle, and bottom of the opening. Record the smallest measurement — walls are rarely perfectly straight.
Step 2: Measure only from finished surfaces. Tiling, shower trays, and wet room floors must be installed and level before measuring. Never measure from bare plaster or an unsealed tray.
Step 3: Check for out-of-plumb walls. Use a spirit level to check both walls for verticality. A wall that leans away from the screen creates a gap at the top; a wall that leans toward it creates a gap at the bottom. The adjustment range must accommodate the total deviation, not just the width difference.
Step 4: Account for tile thickness and adhesive. If the walls are not yet tiled, add the expected tile and adhesive depth (typically 10–15mm per wall) to your measured width.
Step 5: Measure height clearance. Include ceilings, extractor fans, windows, and any boxing. For wet room screens, measure from the finished tray or floor to the desired top height.
Step 6: Match the measurement to the adjustment range. Select a screen whose minimum adjustment figure is equal to or smaller than your smallest width measurement, and whose maximum adjustment figure is equal to or larger than your largest measurement.
A single measurement is never enough. The adjustment range exists because the opening itself varies.
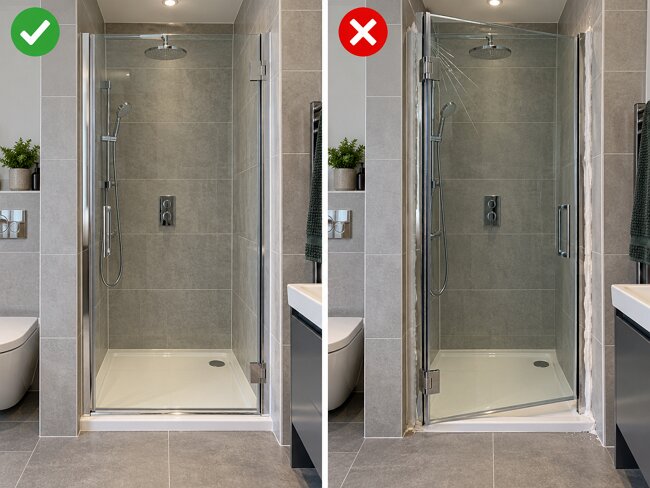
Common Measurement Mistakes That Lead to Shower Screen Failures
Mistake #1: Measuring once. A single measurement at waist height ignores bowing walls, tiling lips, and tray deviations.
Mistake #2: Confusing nominal size with actual fit. Assuming an "800mm screen" will fit an "800mm opening" is the most common and costly error. An 800mm nominal screen may have a maximum adjustment of 800mm and a minimum of 780mm — if the opening is 805mm, it won't fit.
Mistake #3: Ignoring out-of-true walls. Walls that are not parallel create a trapezoidal opening. The screen must accommodate the widest point, not the average.
Mistake #4: Measuring before tiling. Measuring from bare plasterboard or an unsealed tray produces a figure that will be reduced by tile and adhesive thickness. Always measure after tiling and tray installation.
Mistake #5: Overtightening fixings. Forcing wall profiles or hinges to close a gap stresses the glass and can lead to cracking around brackets or hinges.
Mistake #6: Relying on silicone to bridge gaps. Excessive silicone is a symptom of poor measurement, not a solution. It fails over time and compromises water containment.
Every one of these mistakes is preventable by measuring correctly and selecting by adjustment range.
A Practical Installer's Protocol: From Measurement to Selection
Phase 1: Site survey. Measure width at three heights. Record the smallest. Check wall plumb with a spirit level. Note tile thickness if not yet installed. Measure height from finished tray or floor to ceiling clearance.
Phase 2: Product shortlisting. Filter products by nominal size category, then check the adjustment range against your smallest and largest measurements. Discard any screen whose adjustment range does not encompass the full measured variance.
Phase 3: Pre-installation checks. Verify wall type (tile on masonry, tile on stud, plasterboard). Confirm appropriate fixings and reinforcement. Check that the shower tray is level in all directions.
Phase 4: Installation. Position wall profiles loosely first. Use the adjustment range to centre the screen and accommodate wall deviation. Tighten fixings evenly and gently. Re-check alignment with a spirit level before final tightening. Seal with mould-resistant silicone after confirming watertight fit.
The adjustment range is not a luxury — it is the mechanism that makes a standard-sized screen fit a non-standard opening. Use it deliberately.
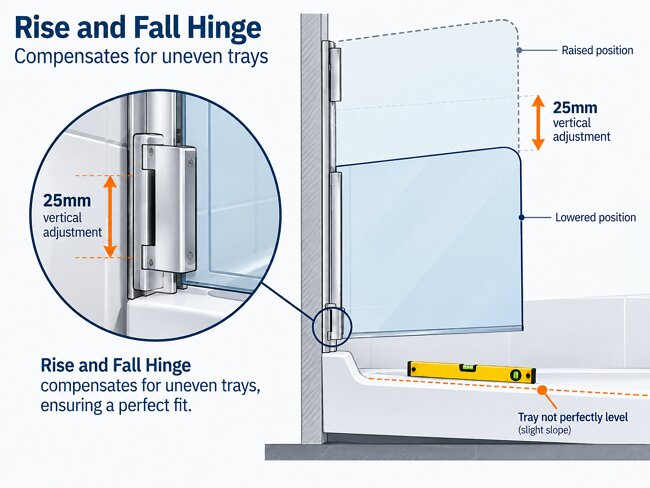
Vertical Adjustment: The Overlooked Dimension
Adjustment range is not only horizontal. Many bath screens and wet room screens also offer vertical adjustment (sometimes called "rise and fall" hinges) to accommodate uneven trays or floors.
Vertical adjustment of 25mm is available on some fixed and pivoting screens. Rise-and-fall hinges allow the screen to be raised or lowered during installation to clear a tray lip or sit flush with a tiled floor.
Vertical adjustment matters because a screen that is perfectly adjusted horizontally can still fail if it cannot clear an uneven tray edge or if it sits too low and drags on the tray. Always check both horizontal and vertical adjustment ranges before specifying a screen.
Conclusion: The Number That Matters Most
Nominal size is a label; adjustment range is the fitting tolerance. Installers who select by nominal size alone are gambling on wall perfection. The installer's protocol is clear: measure the opening at multiple points, record the smallest width, check wall plumb, and select a screen whose adjustment range covers the full measured variance.
In UK bathrooms, walls are rarely true, trays are rarely perfectly level, and openings are rarely what the tape measure first suggests. The adjustment range is the only number that guarantees a professional fit.
Ready to Specify Screens with Confidence?
If you want to eliminate the guesswork from your next installation, explore the certified shower screen range at Elegant Showers. Whether you need a 700mm, 800mm, 900mm, or custom-size enclosure, Elegant Showers offers the adjustment range and certification that UK installers can rely on. Visit elegantshowers.co.uk to browse the full range of certified shower screen solutions.



Validate your login